Showing posts with label BY THEME: Birthday. Show all posts


This weekend, a delightful friend of mine is celebrating her 40th birthday — such a special milestone! Of course, I had to make a card just for her.

The colour palette was inspired by the tiniest detail — a little butterfly I fussy cut from a scrap of DSP in my stash. Its coral and yellow tones guided the rest of the design.

For the layout, I turned to this week’s sketch at Freshly Made Sketches. I loved the split focal point in the sketch, but in the end I kept my circle solid. I toyed with the idea of running the ‘happy birthday’ banner through the middle, but it just didn’t feel like my vibe. Instead, the solid circle gave a perfect base for the '40' and stamped foliage elements.

Here’s what I used:

  • Ranunculus Romance: subtle background texture in Petal Pink

  • Number of Years: bold “40” sentiment

  • Sending Smiles: flower

  • Butterfly Basics: leaf

  • Plus that little DSP butterfly that started it all!

It was fun to combine these retired favourites into a card that feels bright, fresh, and celebratory. Most of all, I love that it was made for someone so special — happy 40th, my beautiful friend!

Happy 40th

August 17, 2025

It’s been a while since I last shared a card here — but this week, I finally sat down to make something special for a friend’s birthday, and it felt so good to get those stamps and inks out again.

For this card, I pulled out an old favourite from my stash: Butterfly Basics. It’s a retired Stampin’ Up! set, but one I still reach for when I want something timeless and pretty.

When I’m feeling creatively rusty, I often look to card challenges for a jump-start — and this week’s colour combo at Global Design Project #GDP505 gave me the perfect palette to play with: Old Olive, Strawberry Slush, and Pretty Peacock. I paired it with the clean and versatile sketch from Freshly Made Sketches — thanks, Jen T!

I began by stamping the sentiment in Pretty Peacock, masking it off, and then adding the large floral image over the top. The image was coloured with blender pens using Strawberry Slush and Old Olive, echoing the challenge colours.

Once the layout was together, something still felt a little flat — so I added a bold 'Happy' in Strawberry Slush and outlined the 'birthday' sentiment with a fine liner. That simple detail gave it a beautiful bordered look and helped the sentiment pop against the rest of the card.

It was a joy to revisit these old favourites and play with some creative prompts. Thanks to the challenge hosts for the inspiration — and happy birthday to my sweet friend this weekend!

Let me know if you’re also crafting with retired sets — I’d love to hear what old favourites are still in your rotation. 💛

Colour Challenge Comeback

July 19, 2025


The Crafty Carrot Co turned 4 this month and to celebrate our team shared a weekend of FREE live stamping video tutorials over on our public Facebook group

For my party project, I chose to feature the Happiest of Birthdays Stamp Set (152539).⁠ Being a sentiment only set, I had to get creative with my other decorative elements. Join me in the replay to see this fun bubble background sponging technique come together. I also explore the idea of turning our beautiful designer series papers into fussy cut embellishments. 

Throughout February, the team and I will be sharing 4 new LIVE tutorials in our exclusive, private Birthday Collection Facebook group. Learn how you can be a part of the fun and join here today: https://craftycarrotcollective.blogspot.com/ 

Making a project based on this tutorial? We'd love to see! Tag us @thecraftycarrotco when you post on your socials.

BONUS

I had such fun with this technique that I couldn't resist trying out an alternative colour combo. Here I've blended soft greens and blues with the 'Bubble Sponging Technique'. While I did a similar fussy cut technique to add a multi-toned sentiment as I did in the video tutorial, for this design I created my own stamped embellishment with the Dragonfly from the Dragonfly Garden Stamp Set (154411).


Thank you so much for stopping by. Inspired to try this technique? I’d love to see your take! Tag me @papercraftbyjenniferfrost

Sponged Bubble Background Magic

January 29, 2021


Hello 2020!

Thank you so much for visiting my blog. If you've been following my work for a while then you may have noticed I've been quiet over here. I have been crafting, but I'm finding it's so much easier to share over on social media than to write blog posts up these days.

My Fancy Friday friends agree and we've decided to shake things up this year! This is our last official 'blog hop'. Moving forward we'll be taking a more modern approach and bringing inspiration to you through Instagram and Facebook @stampinfancyfriday.


Fittingly, the theme for our Fancy Friday challenge today is 'Shake It'. I created this fun interactive slider card complete with a jiggly handmade tassel.

Shaking It with the Stampin' Fancy Friday Design Team

January 31, 2020


The Broadway Birthday stamp set and coordinating dies are my newest favourite birthday craft staple!  Today I wanted to show my class friends these goodies.  I paired them with some recently retired supplies in my stash to demonstrate how easy it is to pick up new tools like these and put them to work with whatever you might already have on hand at home!  Couldn't make it to class in person?  Not to worry, you can now make this project along with me.  I've put together a video tutorial for you all!


The standout for this design is, of course, that bold glittering 'Wish'.  The TGIF team are showcasing glitter over at their challenge site this week.  Check out their page for lots of fun and fancy ways to add a splash of sparkle to your next project.

Supplies Used
Stamps:  Broadway Birthday
Card: Tangerine Tango*, Marina Mist*, Whisper White
Paper: Regals Collection Patterned Designer Series Paper*, Silver Glimmer Paper
Ink: Night of Navy, Pineapple Punch, Tangerine Tango*
Accessories & Tools: Broadway Lights Framelits, Layering Circle Framelits, Stitched Labels Framelits, Big Shot, Silver Thread, Classic Label Punch
Adhesives: SNAIL or double sided tape, Stampin' Dimensionals, Tear'n'Tape, Fine Tip Glue Pen

*retired items.

EXCLUSIVE ONLINE CLASSES

Join five award-winning Stampin' Up! Artisans throughout July as they bring you exclusive video-based tutorials, inspiring projects, as well as behind-the-scenes tips and tricks to bring your paper crafting to the next level!

Find more information, and subscribe to join us today at http://craftycarrotcollective.blogspot.com.au/

In Class, Broadway Birthday

July 1, 2018


The Crafty Carrot Co crew are celebrating our very 1st birthday this month!  Just 12 months ago we launched our first program!  What started as a shopping guide and customer rewards initiative has now become a global community of crafters, including our teams and wonderful subscribers.

The Celebration Time stamp set is a perfect fit for our next live month-long class series.  To join us for this throughout February, simply shop for SU goodies with the Crafty Carrot demo from your region.  Or, subscribe!  Learn more at our webpage *HERE*.

Of course, it wouldn't be a birthday without guests and presents!

We are so excited to announce that our talented friend, fellow two-time Artisan Award winner, Marisa Gunn, is joining the party!  I can't wait to see the exclusive bonus project she presents during the program!


And I said presents, didn't I?  We want to know what you just love doing for your birthday!  Leave a comment:
  •  telling us your favourite way to celebrate your special day 
  •  be sure to include where in the world you are from
  •  before Sunday 21st of January 

    to be in the draw to win some blog candy.    One prize on offer per market - US/CAN/AUS/NZ.  


    For more birthday papercraft inspiration, click the next button below to visit the amazing Krista Frattin!  Her work NEVER disappoints!


    Entries for our February online program close 31st January 2018.

    FEBRUARY PRODUCT FOCUS
    Celebration Time Stamp Set
    Celebration Thinlits Dies (bundle with stamps for 10% off)
    Sweet Soiree Specialty Designer Series Paper

    SUGGESTED FREE SALE-A-BRATION ITEM:
    Party Pandas OR Sweet Soiree Memories & More Card Pack

    Fellow Australian's can pick these goodies up at my online store *HERE*.  Don't forget this month's host code: FNG4V2SP


    Celebration Time, Crafty Carrot Co Blog Hop

    January 9, 2018

    Pieces & Patterns, New Catalogue Launch Party Bendigo, Confetti Celebration, Diagonal Stripe, Birthday Party display, Fancy Friday Blog Hop, Top #5 New Catalogue picks, Stampin' Up!, Papercraft by Jennifer Frost

    Welcome to another Fancy Friday blog hop.  This month we are sharing our top 5 product picks from the new Annual Catalogue.  Yesterday, I shared a heap of photos from a collaborative New Catalogue Launch Party I co-hosted this past Saturday.  But what I didn't share was my display for the event.  It just so happens that I had a chance to play with all of my top 5 picks for this display.  If you follow my blog, then you will have already seen the gift tags and the card!  I'm excited to share with you the other coordinating projects and how it all came together.

    Top 5 New Product Picks, Fancy Friday Blog Hop

    June 30, 2017

    Cake Crazy, Kate Spade Style, Jar of Love, Papercraft by Jennifer Frost, Stampin' Up!, TGIF Challenge

    Dear TGIF challenge blog team,

    Wishing you a very Happy 2nd Birthday!
    Thank you so much for inviting me to your party.
    Once upon a time, it was such a privilege to serve on your team of talented (and super lovely) designers.  And even though life got too busy to keep up with the design team commitment, I still just love following your journey and playing along where I can.  Your challenges inspire my cardmaking and continue to provide creative motivation to this day!

    So Happy Birthday!!  Wishing you much success and love, Jenn xx

    Cake Crazy, Kate Spade Style, Jar of Love, Papercraft by Jennifer Frost, Stampin' Up!, TGIF Challenge

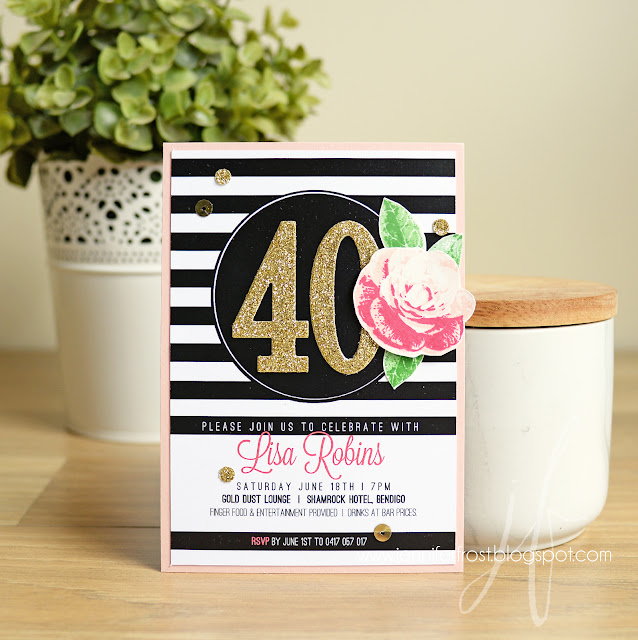
    Now a little about my card.  I have a super clever cake decorating friend who asked me to make her some Kate Spade themed birthday invitations last year.

    Bespoke Handcrafted Birthday Invitation, Papercraft by Jennifer Frost, Stampin' Up!, Kate Spade Inspired, Picture Perfect

    When I looked at the Cake Crazy stamp set, I thought about her and her gorgeous cake creations.  So I was inspired to make a Cake Crazy card, Kate Spade style.

    Cake Crazy, Kate Spade Style, Jar of Love, Papercraft by Jennifer Frost, Stampin' Up!, TGIF Challenge

    Supplies Used:
    Stamps: Cake Crazy, Jar of Love
    Inks: VersaMark, Memento Black, Flirty Flamingo
    Papers: Whisper White, In Colour Designer Series Paper pattern, Basic Black
    Accessories/Tools: White and gold embossing powders, Heat Tool, Everyday Jars Framelit Dies, 1 1/4 Circle punch, Gold thread


    Want to see more of this fun set?  Why not pick up the exclusive Cake Crazy Tutorial Bundle?

    Each Crafty Carrot Co bundle includes five easy to follow tutorials presented in both written and video format. So easy to follow!  And with a design team made up solely of Artisan award winners, you know the projects are bound to be inspirational!

    Cake Crazy Celebration for the TGIF Challenge

    April 28, 2017

    Sale-a-bration, Carried Away Designer Series Paper, Sunburst Framelits, Weather Together, Any Occasion, Basket Bunch, Hot Air Balloon, Papercraft by Jennifer Frost

    Tomorrow Sale-a-bration comes to an end.  Can you believe it's almost already the end of March that these wonderful FREE products will leave us?

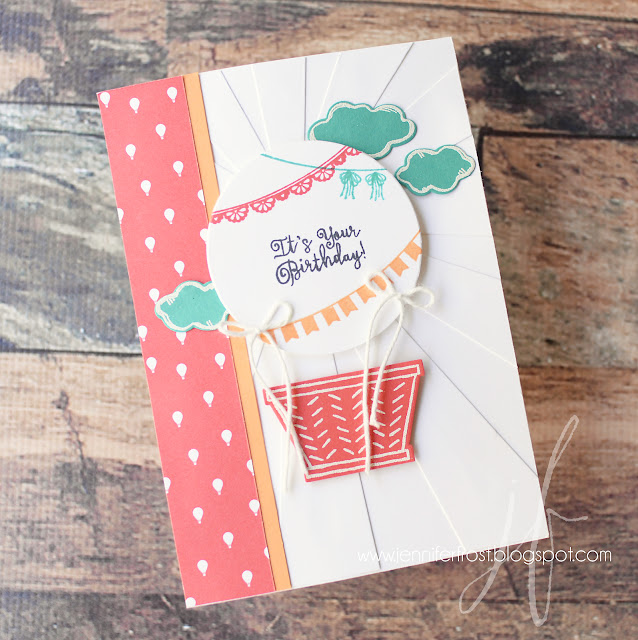
    In today's project I'm sharing two of the exclusive 2017 Sale-a-bration goodies - the Any Occasions stamp set and Carried Away designer series papers.

    Sale-a-bration, Carried Away Designer Series Paper, Sunburst Framelits, Weather Together, Any Occasion, Basket Bunch, Hot Air Balloon, Papercraft by Jennifer Frost

    The Carried Away paper patterns have a cute hot air balloon theme.  I don't actually have any hot air balloon stamps so I thought I'd make my own!  To do this, I've die cut a layered circle framelit from whisper white and embellished with pretty banners from the Any Occasion stamp set.  I've added the Basket Bunch basket below and finished the hot air balloon look with two bakers twine bows as the strings connecting the basket.

    The sentiment comes from the Cake Crazy stamp set.  If you choose to shop in my SU online store today with this month's host code (9N67UXJA), not only will you be able to take advantage of the Sale-a-bration sale, but you will also be gifted FREE access to the Crafty Carrot Co April rewards program featuring this great set! Talk about AMAZING value!!


    Supplies Used:
    Stamps: Cake Crazy, Any Occasion (SAB exclusive), Weather Together, Basket Bunch.
    Inks: Memento Black, Bermuda Bay, Watermelon Wonder, Peek-a-boo Peach, VersaMark
    Papers: Whisper White, Bermuda Bay, Watermelon Wonder, Peek-a-boo Peach, Carried Away Designer Series Paper (SAB exclusive).
    Accessories/Tools: Sunburst Thinlet, Umbrella Weather Framelits, Layering Circle Framelits, Basker Builder Framelits, White Bakers Twine, White Emboss Powder, Heat Tool.

    Carried Away by Sale-a-bration

    March 30, 2017

    Sale-a-bration, Tasty Trucks, Tasty Treats, Birthday Card by Jennifer Frost Australia

    Hello!  I'm popping in quickly today to share with you a little project featuring some fun products you can pick up for FREE.  Yes!  I said FREE!  The Tasty Trucks Stamp set and Tasty Treats Designer Series Papers in this project are available as part of Stampin' Up!'s Sale-a-bration promotion.

    There are only a few days remaining to take advantage of Stampin' Up!'s Sale-A-Bration— the year’s biggest sale!  And just when you thought the promo couldn't get any better, Stampin' Up! have added additional products for you to earn free!


    Don't miss out!  The end of March is quickly approaching and Sale-a-bration will come to an end.

    Supplies Used:
    Stamps: Tasty Trucks (SAB exclusive)
    Inks: Memento Black
    Papers: Whisper White, Shimmery White, Basic Black, Coral Calypso, Daffodil Delight, Tasty Treats Designer Series Paper
    Accessories/Tools: Watercolor Pencils, Blender Pen, Stitched Shapes Framelits

    Don't Miss Out!

    March 28, 2017


    The Party Pop-Up Thinlet dies are a super fun way to create a little surprise for your card recipient when they open your card.  But they also make for a cute embellishment for the front of your project, as I've done here.

    I've simply trimmed the die cut "happy birthday" and layered it over patterns from the Tasty Treats Designer Series Paper pack.  I'm always a bit excited when I find a nice design to use up decorative papers - I have such a large stash and I think this would be simple to adapt to suit other paper collections.

    I've made a little video of this project to share with you.  I hope you enjoy making this along with me.


    Supplies Used:
    Stamps: Weather Together, Confetti Celebration
    Inks: VersaMark, Pool Party
    Papers: Whisper White, Basic Black, Watermelon Wonder, Tasty Treats Designer Series Papers
    Accessories/Tools: Party Pop-Up Thinlets, Stitched Shapes Framelits, Classic Label Punch, Pool Party Embossing Powder (retired), Pool Party Glitter Ribbon (retired), Heat Tool


    Embellishing with the Party Pop-Up Thinlet Die

    February 6, 2017


    Good morning!  I'm all packed and ready to head to my first cardmaking class for the year.  One of the projects we will be making is this birthday card featuring the Weather Together stamp set.  This stamp set has been having quite a workout at my desk this month, let me tell you!  It's the product focus over at The Crafty Carrot Collective's FREE January program.  This week, my talented friend Susan Wong shared a CASE inspired tutorial and I loved her project so much I wanted to play along straight away.

    How adorable are the little presents in this set?  I've followed Susan's lead and used them to create a background.  Then I've embellished with a little peek-a-boo peach ribbon which I've paired with the sentiment from the Suite Sentiments stamp set from the catalogue.

    Watch me put this project together over at my NEW YOUTUBE CHANNEL.

    The Suite Sentiments stamp set will be The Crafty Carrot Collective's February product focus.  Shop at the online SU store of any of our participating demonstrators in January to qualify for FREE ACCESS to this next program of tutorials, classes and challenges featuring this fun set.  Learn more HERE.


    I hope that you join us this week for the CASE challenge!  I can't wait to see what you come up with.  Don't forget the #thecraftycarrotcoJAN17 hashtag so we can find your project.

    Have a wonderful weekend!!
    Jenn

    Supplies Used:
    Stamps: Weather Together, Suite Sentiments
    Inks: Memento Black, Pear Pizzazz, VersaMark
    Papers: Whisper White, Pear Pizzazz, Basic Black
    Accessories/Tools: Stampin Write Markers (Peek-a-boo Peach and Basic Black), Heat Tool, Pool Party Embossing Powder (retired), Peek-a-boo Peach Ruffled Ribbon, Stitched Shapes Framelits Dies (available again June 2017)


    January CASE Challenge, The Crafty Carrot Collective

    January 14, 2017

    Superstar, Number of Years, Balloon Celebrations, Cake Topper, TGIFc65, Stampin' Up!, Papercraft by Jennifer Frost

    We celebrated my son's 7th birthday this month.  I put together this little cake topper set to decorate his cake.

    Superstar, Number of Years, Balloon Celebrations, Cake Topper, TGIFc65, Stampin' Up!, Papercraft by Jennifer Frost


    I'm sharing this project as part of this week's TGIF 'cut the cake, or whatever...' theme challenge.

    Each topper started with a die circle framelits die base and I've built up stamped elements from a number of sets to complete (see details below).

    Wishing you all a wonderful weekend!


    #TGIFc65 Cut the Cake

    July 23, 2016


    My beautiful girl turned 3 this week.  We had a little family get together with cake to celebrate.  I'm not much of a cake decorator, but as you all know, I do love playing with paper!  So I let someone else bake and I put together this cake topper to add my own special touch to this birthday treat.


    I started by cutting a number of the Botanical Builder Framelit die leaves in Always Artichoke and sticking them together with Tear and Tape adhesive to create the base for the floral banner.  Then I added a spray of blooms in Melon Mambo pink and white tones, with extra leaves in Old Olive.

    The Large Number Framelit die was perfect for the '3' which I cut from Blushing Bride Glimmer paper.  Once the banner was finished I stuck it to some bamboo skewer sticks I had floating around in my kitchen draw ready for the cake.

    The birthday girl had a lovely birthday and it was a pleasure to share in the joy and excitement of it all with her.

    3rd Birthday Cake Topper

    June 11, 2016

    Instagram

    Blog Archive