Showing posts with label Fancy Friday Design Team. Show all posts


Dragonfly Garden (154411) was the first stamp set I got to play with from the new Stampin' Up! Mini Catalogue released last month. 

I love the tranquil meadow scene it's imagery calls to mind.

For the first project (above), I've embossed those pretty florals on a pool party card base background. Then I added a mix of soft pinks, enjoying some mindful colouring time with those stripy dragonfly wings.⁠

For the second project (below), I was inspired by the tones of the Dandy Garden designer series paper to draw together something a little less whimsical, something closer to nature.


I shared another project using featuring the dragonfly imagery earlier this month. Find it here: https://jenniferfrost.blogspot.com/2021/01/happiest-of-birthdays-bubble-background.html

Dragonfly Garden

February 8, 2021


Hello 2020!

Thank you so much for visiting my blog. If you've been following my work for a while then you may have noticed I've been quiet over here. I have been crafting, but I'm finding it's so much easier to share over on social media than to write blog posts up these days.

My Fancy Friday friends agree and we've decided to shake things up this year! This is our last official 'blog hop'. Moving forward we'll be taking a more modern approach and bringing inspiration to you through Instagram and Facebook @stampinfancyfriday.


Fittingly, the theme for our Fancy Friday challenge today is 'Shake It'. I created this fun interactive slider card complete with a jiggly handmade tassel.

Shaking It with the Stampin' Fancy Friday Design Team

January 31, 2020


We are sharing ideas for male themed designs today on the Fancy Friday blog hop.

The Sailing Home suite from the new catalogue was an obvious choice for me to feature.  I've been enjoying all things "Sailing Home" this past month as part of the Crafty Carrot Collective (CCCo) August series of online classes.  As a designer with the CCCo, I'd normally not be able to publically share my tutorial design with you. However, as we opened this series up FREE for all to join, I have a rare opportunity to show you my exclusive project from this month!

To make this card, and see many more 'Sailing Home' project ideas, head on over to the Sailing Home Facebook group today!  Once you've joined, you'll find this detailed video tutorial, and more, to watch at your leisure.

And of course, follow this blog hop by clicking the 'next' button below to see what 'For the Men' inspiration my amazingly talented Artisan award-winning Fancy Friday friends have come up with for you!  Next up is the fabulous Krista Frattin


 Love this design? Find more of my projects on
FACEBOOK  |  INSTAGRAM  |  PINTEREST  |  YOUTUBE


TAKE YOUR CRAFTING TO THE NEXT LEVEL

Attend live online classes with four multi-award-winning Stampin' Up! Artisans! Join our Crafty Carrot Co program from anywhere in the world, from the comfort of your own home!  Follow video-based tutorials, be inspired and see behind-the-scenes tips and tricks to bring your cardmaking to the next level, whether you're a beginner or have years of experience there is something for you! 


Find more information, and subscribe to join us today at http://craftycarrotcollective.blogspot.com.au/

For the Men, Fancy Friday Blog Hop

August 30, 2019


The brand new 2019 Stampin' Up! catalogue is live.  The Fancy Friday team are blog hopping today to share their favourite product picks from the publication.  Mine?  The 'Above the Clouds' stamp set and matching punch.

I created two versions of this card.  Everything for the first variation (pictured above) is available in the new catalogue, from the 2019–2021 In Color Designer Series Paper pattern to the returning metallic edge ribbon.

Originally, I'd created the variation below for a recent class.  I used a retired Soft Sky pattern for the background, a splash of ribbon left over from this year's Sale-a-bration promotion and I simply stamped the sentiment on white rather than the more involved heat embossed technique.


It just goes to show that, with a few tweaks, you can combine new goodies with whatever you have on hand to create beautiful designs.

Here is a full video tutorial of this project for you!  I'd love if you were inspired to create along with me.


This particular stamp set will be the focus of The Crafty Carrot Co tutorials throughout July.  Join the exclusive facebook group for design ideas featuring this set all month long.  To learn more, see: http://craftycarrotcollective.blogspot.com/

Click the 'Next' link below to see what my fancy friend Paula's new catalogue favourites are!


Love this design? Find more of my projects on
FACEBOOK  |  INSTAGRAM  |  PINTEREST  |  YOUTUBE


TAKE YOUR CRAFTING TO THE NEXT LEVEL

Attend live online classes with four multi-award-winning Stampin' Up! Artisans! Join our Crafty Carrot Co program from anywhere in the world, from the comfort of your own home!  Follow video-based tutorials, be inspired and see behind-the-scenes tips and tricks to bring your cardmaking to the next level, whether you're a beginner or have years of experience there is something for you!

Find more information, and subscribe to join us today at http://craftycarrotcollective.blogspot.com.au/

New Catalogue Favourite, Fancy Friday Blog Hop

June 28, 2019


Welcome to another round of the Fancy Friday blog hop! We are a group of past and present Stampin' Up! Artisans who love to bring you fresh inspiration each month. This May, we are inspiring you pull out those designer series papers and make pretty things with them!

It's a huge goal of mine right now to get my collection of patterned papers off the shelf and turned into projects.  While looking through my stash, I came across some sheets of this beautiful blue and green Share What You Love pattern.  It is a heavy weight paper with a lovely translucent, pearlised finish. I wanted to show it off one last time before it retires on Monday.

LAST CHANCE PRODUCTS

It's not just your last chance to order these gorgeous Share What You Love papers, but also the coordinating embellishment kit and the Lovely Floral embossing folder featured here too.  Buy yours today before they are gone!  Order through my online store and have your stamping supplies delivered straight to your door, wherever you are, Australia wide. 

Host code for customer rewards: 3V7S2RGE


This project was inspired by my the fabulous Lauren Alarid.  No one does blues and greens quite like her! 

For more patterned paper project fun, click the 'Next' link below to see what my clever friend Marisa Gunn has for you today!


Love this design? Find more of my projects on
FACEBOOK  |  INSTAGRAM  |  PINTEREST  |  YOUTUBE

Supplies (All Stampin' Up! unless specified)
Stamps: Flourishing Phrases
Card: Pool Party, Tranquil Tide
Ink: Bermuda Bay
Paper: Share What You Love Specialty Designer Series Paper
Accessories & Tools:  Pearlised Doily, Share What You Love Embellishment Kit, Lovely Floral Dynamic Textured Embossing Folder, Big Shot.
Adhesives: SNAIL or double-sided tape, Stampin' Dimensionals, Tombow Multipurpose glue.

Step by Step

  1. Emboss pool party card panel 101 x 145mm with floral folder.  Add Tranquil Tide card panel 70 x 85mm.  Attach half a pearlised doily.  Layer over patterned panel 73 x 80mm.  Add a large white tag from the Embellishment kit.  Add twine and then attach to the front of folded pool party card 149 x 297mm. 
  2. Stamp sentiment on pool party.  Trim into banner and attach with dimensionals over twine. 
  3. Cut some flowers from the floral pattern and adhere to finish.

Share What You Love, Fancy Friday Blog Hop

May 31, 2019


Hello!  Today, I'm joining the Fancy Friday blog hop as we share projects created especially for family.  This theme was perfect for creating a class around!

When I made this gift bag, it was not my intention to create a full set of projects.  We have been featuring the Gift Bag Punch Board in class these past few months.  I wanted to show class participants how the tool could be used to create an extra large gift bag that would fit their handmade cards in.  Who else loves giving packs of their own handmade cards as gifts?


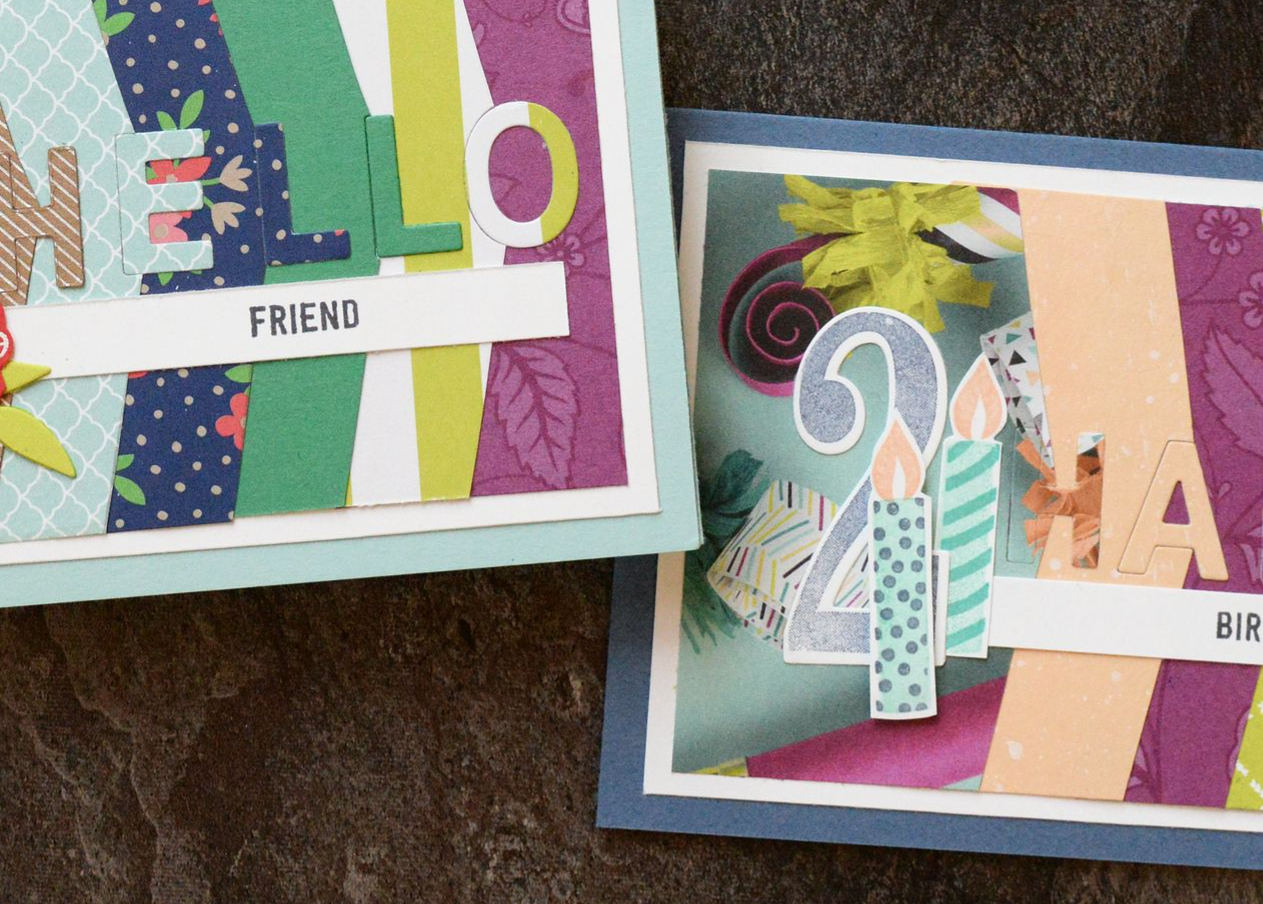
Once I cut the 12"x 12" designer series patterned paper pieces for this project, I was left with two panels that were perfect for matching cards - and so a set was born!


Each participant enjoyed choosing one piece of 12" x 12" paper to work with and pairing it with whatever sentiment they liked.  Popular choices were Easter, birthday and Mother's Day.

Supplies for the cards 
Stamps: Touches of Texture plus a sentiment, here I've used Itty Bitty Greetings and Best Bunny
Card: Whisper White, Gray Granite
Paper: Neutrals Designer Series Paper (this particular pattern is retired but you could easily substitute with ANY paper that calls to you)
Ink: Granite Gray, Call Me Clover, Grapefruit Grove, Petal Pink, VersaMark
Accessories & Tools:  White embossing powder, Heat Tool, Blender Pen, Basic Black Stampin' Write Marker
Adhesives: Tear'n'Tape, Dimensionals, Multipurpose Glue


Bonus gift box
The class was held in the week before Easter, so it seemed fitting to squeeze in this little bonus Easter gift box.  Another example of a different idea for the Gift Bag Punch Board.


Do you have the Gift Bag Punch Board at home?  Make the most out of this tool and pick up a copy of my tutorial bundle today.  It includes three alternate project ideas and at just $3US it's an absolute steal!


 Includes a 12 page, full-colour PDF with step-by-step photos and instructions in both A4 and Letter format.  Just $3US


LAST CHANCE PRODUCTS

Both the punch board and the beautiful Touches of Texture stamp set featured here are retiring.  Buy yours today before they are gone!  Order through my online store and have your stamping supplies delivered straight to your door, wherever you are, Australia wide. 

Host code for customer rewards: 79W2YYAU


CONTINUE THE HOP!
For more family-friendly project fun, click the 'Next' link below to see what the amazing Connie Collins has for you today!


Love this design? Find more of my projects on
FACEBOOK  |  INSTAGRAM  |  PINTEREST  |  YOUTUBE


TAKE YOUR CRAFTING TO THE NEXT LEVEL

Attend live online classes with four multi-award-winning Stampin' Up! Artisans! Join our Crafty Carrot Co program from anywhere in the world, from the comfort of your own home!  Follow video-based tutorials, be inspired and see behind-the-scenes tips and tricks to bring your cardmaking to the next level, whether you're a beginner or have years of experience there is something for you! 


Find more information, and subscribe to join us today at http://craftycarrotcollective.blogspot.com.au/


For Family, Fancy Friday Blog Hop

April 26, 2019


Today, I'm joining the Fancy Friday blog hop for a CASE the Catalogue Challenge!  In class earlier this month, I featured this little faceted gift box made using the Gift Bag Punch Board. 
I first saw this interesting project when Jessica Winter created it for the Stampin' Up! Corporate blog a few years ago.  Upon searching, I sadly couldn't find her original post. So I investigated further and found that Julie Dimatteo had a video tutorial - brilliant, thanks Julie! 
Once I had the box base, I 
drew inspiration from a pretty package, found on page 19 of the Annual Catalogue, for the final decorative touches.
  
I choose the Share What You Love Speciality Designer Series papers for my lids.  These papers have a great weight for 3D projects and their pretty patterns with their shimmery detail are perfect for layering a few embellishments on.
The sentiment comes from the Itty Bitty Sentiments set.  I like the generic 'For You' as you could use these for any occasion.  I think mine will be gifted this Easter with a few tiny treats inside!

These boxes made for a SUPER FUN class project!  Whilst Julie's video was awesome for helping me put the class sample together, I found a step-by-step instructional worksheet was best for walking my class group through the project on the day.  Let me tell you, everyone was in awe of this unique use for the Gift Bag Punch board and raved about how they look forward to making their own boxes at home!  

STEP-BY-STEP FACETED GIFT BOX TUTORIAL
Your class participants are sure to go crazy for this special gift bag punch board project too!  Simply pick up a copy of this Gift Bag Punch Board tutorial bundle, print at home and you are ready to go!

The bundle includes detailed instructions for this faceted gift box, but also for an XL gift bag (perfect for putting your handmade cards in!) and a small rectangle treat box too.

Includes 13 page, full colour PDF with step-by-step photos and instructions in both A4 and Letter format.  
Just $3 US


CONTINUE THE HOP!
For more CASE the Catalogue project ideas, click the 'Next' link below to see what my talented friend Elizabeth Price has for you today!


Love this design? Find more of my projects on
FACEBOOK  |  INSTAGRAM  |  PINTEREST  |  YOUTUBE


STEP UP YOUR CRAFTING GAME

With it's pretty, bright colour scheme and delicate laser-cut overlays, The Crafty Carrot Co knew it would be so fun to teach you how to use all the Incredible Like You precut elements to develop new skills, step up your crafting game and create your own unique cards and memory keeping projects.

It's not too late to join us this April!  Reserve your spot in this exclusive class series today: http://craftycarrotcollective.blogspot.com/


Diamond Shaped Gift Box, Fancy Friday Blog Hop

March 29, 2019

Blog Archive