Showing posts with label BY STAMP: Secret Garden. Show all posts
In this round of the Creation Station blog hop we are celebrating weddings!


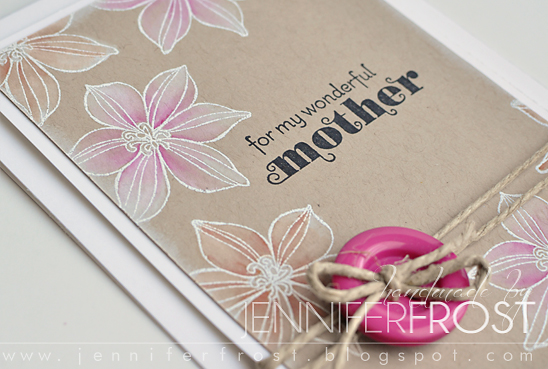
I like creating custom wedding cards that tie in with the invitations and colours chosen by the bride and groom for the occasion. But as I don't have any weddings coming up, I've gone with one of my favourite colour schemes - mocha and rouge.  I got my hands on the brand new Blendabilities markers this week! These flowers from the retiring Secret Garden set were perfect for colouring with these, and oh my... so much fun!


The sentiments are from the Something to Say set, also from the new catalogue!

Only one project this round!  I hope that you have enjoyed this design.  Now be sure to hop over to see what the rest of the design team have created!


The layout for this design was inspired by the current sketch challenge at Freshly Made Sketches.


Love and Marriage - Creation Station Blog Hop #4

June 15, 2014

It is Sale-A-Bration (SAB) time! This promotion is Stampin' Up!'s biggest sales event of the year.  In the spirit of SAB, class participants created this card featuring some exclusive SAB papers and a sentiment from the See Ya Later SAB exclusive stamp set. For details about the SAB sale, please don't hesitate to contact me for a free brochure.


I love when I can show class participants how to use a product in a new way.  In this design I had a large blank space at the bottom of my card and I wanted a subtle element to feature here.  I already had the Secret Garden framelits out on my desk from creating the flowers. So I experimented and did a little embossing with one of these framelits to create the impression of the leaves in the bottom.


I had a special request that we create a sympathy card design this month.  When I create sympathy cards I like to use soft and neutral colours.  Here the colour palette is soft sky, basic grey and a touch of garden green for the flower stems.  Class participants had the chance to practice colouring on the stamp with Stampin' Write Markers to create the multi-coloured main image, which comes from Stampin' Up!'s Love and Sympathy stamp set.  The background stamp, Hardwood, comes from the new Occasions catalogue.  I do own the Woodgrain background stamp already and so was tossing up as to whether I needed another timber themed stamp. But I've seen so many incredible designs featuring this item and just had to have it! This has simply been stamped in white craft ink onto the basic grey cardstock.


In December, we first played with the fun new circle thinlets die.  I wanted to show participants a variation with this die that extends the card to create an extra fold out panel.  The sahara sand card base was cut to 13.8 x 21cm.  This allowed me to make the most of my A4 cardstock - creating two card bases from a single sheet.  The design has a nautical theme featuring the Open Sea stamp set.  Participants got the chance to practice creating a sailors knot in twine to tie in with this theme.


February is a busy month for me.  I'm looking forward to my birthday this week (I'm getting pampered at the day spa - yay!) and the LMK ball the week after.  Because of all the things I have to do in the lead up to these events, my March class will be pushed back just a tad. I definitely hope to sneak in a class before SAB ends on the 31st of March.  Will keep you posted when I have scheduled the next date!


In Class - February 2014

February 9, 2014


I created this sample using one of my January DIY card challenge kits.  I love the Old Olive and Rich Razzleberry colour combination in this piece of Floral District DSP and wanted to come up with a layout that allowed it to dominate.

For more inspirational designs using these papers please visit my facebook page album featuring entries for the January competition.

DIY Card Kit Challenge - January 2014

January 9, 2014


In honour of Mother's Day which is just around the corner, we created three very floral and feminine cards in class this month.  All three cards feature imagery from the Secret Garden Stamp set currently available in the Stampin' Up! mini catalogue.


This first card design allowed us to practice our heat embossing with a spray of lovely flowers in white on Crumb Cake card.  We then coloured these flowers with whisper white ink lending a beautiful soft feel to the design.  A pop of colour was layered over the top of the flowers once the white base had dried.


Our second card had a very different, arty feel to it.  We stamped the large outline flower from the Secret Garden set across the whisper white front and added a spritz of colour with the colour spritzer and some Stampin' Write Markers.  The ink splatter stamp from the French Foliage stamp was the perfect way to add some additional colour.  A strip of Floral District DSP, some coral calypso bakers twine and a sentiment layered on the Modern Label punch shape finished the design off nicely.


You may recognise this third design, I originally featured the layout in March as it was initially created in the Pattern Play online class I took.  I've changed the colours so I could feature current DSP from the Floral District paper pack.  Again, class participants were able to practice some more heat embossing, this time with black to create the sentiment on the front of the card.  


If you have any questions about these projects or about future class dates please don't hesitate to contact me.

I am hoping to be able to schedule classes again later this year - hopefully in Spring.  My husband and I are expecting our second baby this June so I will need a little time to adjust to life with our new addition before I can get another class organised.  I will continue to take orders during this little period of 'maternity leave' and I am also open to enquiries for workshops from August onwards.  I know it is ambitious but I would also like to have a new catalogue open house in July sometime if possible - keep an eye on my e-newsletters for more information.  

32 weeks and counting...


In Class - April 2013

May 5, 2013


The fourth session of Pattern Play focused on altering patterns to create a new look.  As will all the sessions so far there were lots of tips that I look forward to exploring further!  In this design I employed Shari Carroll's technique for giving patterned paper a new look by creasing, distressing and sanding it in a pattern, in this case creating a haphazard grid.  I've also added some bold flowers from the Secret Garden stamp set.

A strip of what the paper looked like prior to altering features on the inside of the card:


All products Stampin' Up!
Stamps: Teeny Tiny Sentiments, Secret Garden
Paper: Sahara Sand Card Base,  Whisper White, Wisteria Wonder for the flower, Cheerful Treat DSP (retired) and Neutrals Designer Paper Stack (Sahara Sand text pattern). 

Pattern Play #4

March 24, 2013


In this design I have stamped the pretty flowers from the Stampin' Up! Secret Garden stamp set onto some patterned paper and then cut them out to stick in place on the card front.  I've finished with a strip of Everyday Enchantment Designer Series Paper (retired) in matching Poppy Parade Red and Very Vanilla on the right edge of the card.  

I even decorated the inside:


All products Stampin' Up!
Stamps: Secret Garden, One in a Million
Paper: Sahara Sand Card Base, Everyday Enchantment DSP (retired) for the 'large' font pattern along the right, In Colour 2011 DSP for the large flower (Poppy Parade Dots), Neutrals Designer Series Paper Stack (Very Vanilla Dots) for the small flower component and a touch of Basic Black card stock for the banner.

Pattern Play #2

March 22, 2013


Our creations in March incorporate more of those fun Sale-A-Bration products.  This card uses the Sycamore Street Designer Series Paper as a base.  The centre panel has been created on white gloss and coloured using the brayer and coral calypso ink then stamped over with imagery from the Secret Garden Stamp set available in the current mini catalogue.  Then I've embellished with a pretty Secret Garden flower, layered Rich Razzleberry butterfly and a 'for you' sentiment from the Itty Bitty Banners Stamp Set. 


This second card was inspired by a design on page 15 of the current Summer Mini Catalogue. It features the new Honeycomb Textured Embossing folder and cut out hexagons from patterned paper to decorate.  The sentiment is a retired one from the Grunge Rock stamp set.  It is very rare that I will use a retired stamp set in class but I wanted something that suited a male themed card and this worked in the design for me.

`

The final project we made was this cute Easter card featuring the Sweet Treat Cup product from Stampin' Up!  We decorated the card with the soft egg patterned paper from the Birds of a Feather DSP and imagery from the Everybunny Stamp Set.  I taught the ladies to create this little 'secret compartment' in the card so that the Sweet Treat cup could be filled and emptied without spoiling the design.  


The cups were filled with a mix of yummy white and pink jellybeans that matched in nicely with the the colours of our papers. 


If you have any questions about these projects or about future class dates please don't hesitate to contact me.


In Class - March 2013

March 17, 2013

Blog Archive