Showing posts with label BY STAMP: Broadway Birthday. Show all posts
This week's Use Your Scraps project was inspired by the latest TGIF Challenges theme, "Popping It Up." 

When I saw the challenge, I immediately thought of the Floating Strips Technique that I'd been wanting to try. It seemed like the perfect opportunity to use up all those narrow cardstock strips that seem to accumulate on my craft desk.

For my first card, I followed the traditional technique after watching a few tutorials online. I paired the floating strips with this month's Stampin' Up! colour challenge colours and added an inlaid die-cut spray of leaves through the centre of the floating circle. 

I absolutely love the finished result—the floating strips create such a striking effect—but I quickly discovered that the inlaid die-cutting made the project quite fiddly.

That got me thinking… could I simplify the design while still keeping the beautiful floating effect?

For my second card, I swapped the intricate inlaid design for a stamped lighthouse image layered over the floating strips. The finished card has a completely different feel, creating a simple masculine design that really shows how versatile this technique can be. 

Thank you Atlantic Hearts Sketch for inspiration in bringing this one together!

By this point I had plenty of leftover strips sitting on my desk, and another question popped into my mind. Most Floating Strips Technique tutorials use window sheet (acetate) to hold the strips together. 

But what if you don't have any? Could the technique still work?

So I decided to experiment.

Inspired by this week's Simon Says Stamps 'Stars and/or Stripes' challenge, I reached for a large star-shaped die, and arranged my leftover strips in rainbow order, securing them temporarily with washi tape before running them through my die-cutting machine. I also created a simple cardstock template using the same die so I could place each strip back into position after die-cutting. 

To my delight, it worked! While it isn't exactly the same as using window sheet, it creates a very similar effect using supplies most cardmakers already have.

I finished the design using the current Global Design Project Sketch challenge as inspiration. 

One of my favourite things about crafting is following an idea to see where it leads. What began as simply trying a new technique quickly turned into three different cards, each exploring a slightly different approach. Along the way, I not only discovered a beautiful design but also found a simpler version and a way to create the look without acetate. That's exactly why I love experimenting—it often leads to ideas I'd never have discovered if I'd stopped after the first card.

Watch the Video

If you'd like to see exactly how these cards came together, along with all the tips and tricks I discovered along the way, be sure to watch this week's video. I'd also love to know which of the three versions is your favourite!

If you've been wanting to try the Floating Strips Technique, I hope these three variations inspire you to give it a go—whether you follow the traditional method or experiment with your own twist.


Cardmaking with Scraps

If you enjoy this kind of scrap-based cardmaking, I’ve also put together a Cardmaking with Scraps printable guide.

It includes 8 scrap-friendly card projects with measurements, photos and step-by-step “recipes” you can keep beside your desk for inspiration when you’re working through your stash.

👉 Learn more HERE

Happy crafting,

Jenn

Floating Strips Technique 3 Ways

July 1, 2026

One of the things I love about creating backgrounds from scraps is that every piece turns out differently. This abstract landscape-inspired background was so much fun to put together, using a mix of leftover cardstock scraps to create a colourful scene.

The challenge, of course, comes after the background is finished. Once you've created something this detailed, it can be surprisingly difficult to decide how to turn it into a finished card without covering up all that hard work!

Turning a DIY Background into a Finished Card

When I'm feeling a little stuck, I often turn to challenge blogs for inspiration, and this card ended up drawing ideas from several current challenges. The starting point was the Hot Air Balloon Day challenge at Festive Friday. As soon as I saw the theme, I knew hot air balloons would be the perfect addition to this landscape-style background. 

As per the challenge theme, I incorporated a hot air balloon, a birthday theme, bunting, primary colours and epoxy embellishments. The hot air balloon adds a playful focal point while still allowing the background to remain the star of the show.

To help with the card layout, I also drew inspiration from the current Freshly Made Sketches challenge. I added layers of vellum and a scrap of blue polka dot patterned paper behind the hot air balloon to create a central focal area while still letting the background shine through. 

The "Just Add Polka Dots" challenge at Just Add Ink, inspired me to reach for some spotty patterned papers both in the background and on the hot air balloon itself, adding another layer of interest and texture to the finished design.

Watch the Tutorial

Cardmaking with Scraps

If you enjoy this kind of scrap-based cardmaking, I’ve also put together a Cardmaking with Scraps printable guide.

It includes 8 scrap-friendly card projects with measurements, photos and step-by-step “recipes” you can keep beside your desk for inspiration when you’re working through your stash.

👉 Learn more HERE

Happy crafting,

Jenn

A Landscape Built from Leftovers

June 1, 2026


I'm so glad the Broadway Birthday stamp set and coordinating dies are sticking around for another Stampin' Up! Catalogue year. Every cardmaker needs a versatile birthday set in their collection.

Throughout June, The Crafty Carrot Co can't wait to show you just how well-rounded this stamp set really is!  We are pairing it with patterned papers (new and old) to create unique looks and variations to make any of your loved ones feel like a star on their birthday!

For my card today, I decided to cut up those busy Broadway Bound papers and share a quick and easy layout idea. It was a great opportunity to feature the bold Lemon Lime twist tone that retires this month.


DON'T MISS THE FUN


SECURE YOUR SPOT TODAY


Of course, these blog hop projects are just a few of our ideas, we save the best for our exclusive Facebook live classes.  Subscribe today to catch all the fun throughout June!

HOW?

Place a Stampin' Up! order with your local Crafty Carrot demonstrator or subscribe below.  We can't wait to craft with you!

Click the next link below to see what my Crafty Carrot friend, the talented  KristaFrattin of Stampin' Dolce fame, has to share with you!


Love this design? Find more of my projects on
FACEBOOK  |  INSTAGRAM  |  PINTEREST  |  YOUTUBE


Supplies:
Stamps: Broadway Birthday
Card: Whisper White, Lovely Lipstick, Lemon Lime Twist
Ink: Memento Tuxedo Black, Lemon Lime Twist
Paper:  Broadway Bound Specialty Designer Series Paper
Accessories & Tools: Broadway Lights Framelits
Adhesives: SNAIL or double-sided tape, Stampin' Dimensionals, Fine Tip Glue


Step by Step:
  1. Border party pattern 101 x 144mm on front of folded lemon lime twist card 149 x 210mm.
  2. Create lime card banner 85 x 105mm.  Stamp sentiment in black and add balloon and string in lemon lime twist. 
  3. On white card 72 x 23mm, stamp 'wish' in lime.  Add to card on dimensionals over lipstick strip 97 x 20mm that has been cut with diamond strip framelit.

Broadway Birthday, The Crafty Carrot Co

May 14, 2019


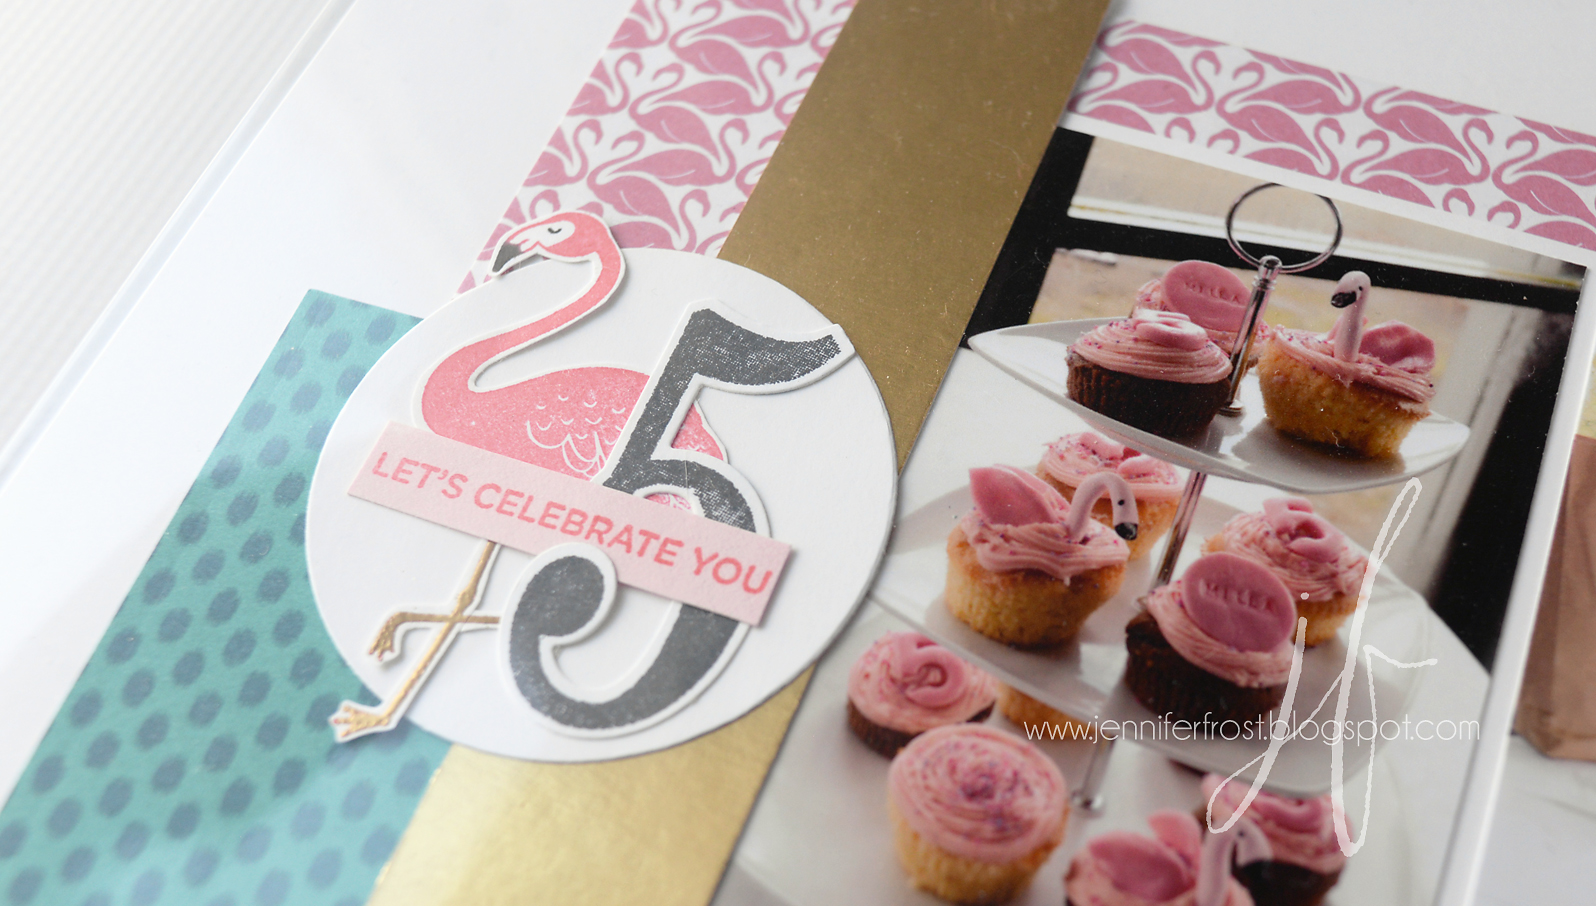
Who says you can't have a pool party in the middle of winter!  My daughter had her heart set on a flamingo themed swimming party with her kinder friends this year. So grateful for our indoor heated pool complex. Turns out they have a really fun birthday package - it was a huge hit!


A special thanks to my lovely friend Tanya Rees for the loan of this Pop of Paradise stamp set!  Not only did it help Miss 5 to put together the theme she wanted, but it also meant I got the memories documented ASAP so I could return the stamps in good time! Thanks again for the loan, Tan!

I hope you've enjoyed this project!


Find more of my work on
FACEBOOK  |  INSTAGRAM  |  PINTEREST  |  YOUTUBE

Pieces of the Story, Let's Flamingle - 5th Birthday Celebrations

August 10, 2018


I'm joining the Let's Get Hopping blog hop today as we share our 'go to' techniques!

I tend to move through technique trends and at the moment I'm having a love affair with water-colouring, specifically Brushos!

It all started when I decided to feature this fun colouring tool in class earlier this month.  I wanted to show my crafty friends a variety of ideas for adding a watercolour touch to their cardmaking projects and the inspiration just keeps coming to me and I can't seem to stop!!

Of course, you can't have a watercolour for cardmakers workshop without a trendy background splash effect.  With this project, I showed participants how they could make their own vibrant, two-toned messy painted backgrounds with these fun powders.

The bold, bright colours were a great fit for the Broadway Birthday stamp set!  This set has fast become my birthday go-to product!  I layered the stamped elements in the style of my super talented friend Krista Frattin.

If you missed the class, you can still make this along with me at home. Check out the tutorial on my YouTube channel!  Don't forget to leave a comment and let me know you've enjoyed the project - I love hearing from you!


Click along the 'next' link below to see which technique my very talented friend Tanya has to share today!

Supplies Used
Stamps: Broadway Birthday
Card: Whisper White, Shimmery White, Lovely Lipstick, Balmy Blue
Paper: Broadway Bound Specialty Designer Series Paper, Vellum
Ink: Memento Tuxedo Black, Gorgeous Grape, Lovely Lipstick
Accessories & Tools: Broadway Lights Framelits, Brushos Crystal Colour, Aqua Painter, Starburst Punch, Metallics Sequin Assortment, Candle Embellishments
Adhesives: SNAIL or double sided tape, Fine Tip Glue Pen, Stampin' Dimensionals (Mini)

Find more inspiration from me on
FACEBOOK  |  INSTAGRAM  |  PINTEREST  |  YOUTUBE

Brushos Crystal Colour, Let's Get Hopping

August 9, 2018


I printed these photos AGES ago but never got around to putting a layout together - until now!  I must have just been waiting for the perfect products to pair these party pictures with. I found that in the Broadway Birthday suite!


The Broadway Birthday stamp set is packed with staple birthday imagery - party hats, candles and balloons!  And it has coordinating dies that help you make embellishments in a flash, like this gold foil 'Wish' wording!


The Broadway Bound Specialty Designer Series Paper has bright party designs on one side, and all-occasion designs with gold foil on the other side!  I couldn't resist using this gold, black and grey 'confetti' for my layout base.

This suite is the star of this month's Artisan Design Team blog hop!  Be sure to click the next link below to see all the amazing birthday inspiration on offer.  Next up is the very talented Jessica Winter!


Supplies Used
Stamps: Broadway Birthday
Card: Whisper White, Pacific Point, Basic Black
Paper: Broadway Bound Specialty Designer Series Paper, Gold Foil
Ink: Memento Tuxedo Black, Pacific Point, Pineapple Punch
Accessories & Tools: Broadway Lights Framelits Dies, Layering Circles Framelit Dies
Adhesives: SNAIL or double sided tape, Fine Tip Glue Pen


Broadway Birthday, Stampin' Up! Artisan Design Team Blog Hop

July 20, 2018


The Broadway Birthday stamp set and coordinating dies are my newest favourite birthday craft staple!  Today I wanted to show my class friends these goodies.  I paired them with some recently retired supplies in my stash to demonstrate how easy it is to pick up new tools like these and put them to work with whatever you might already have on hand at home!  Couldn't make it to class in person?  Not to worry, you can now make this project along with me.  I've put together a video tutorial for you all!


The standout for this design is, of course, that bold glittering 'Wish'.  The TGIF team are showcasing glitter over at their challenge site this week.  Check out their page for lots of fun and fancy ways to add a splash of sparkle to your next project.

Supplies Used
Stamps:  Broadway Birthday
Card: Tangerine Tango*, Marina Mist*, Whisper White
Paper: Regals Collection Patterned Designer Series Paper*, Silver Glimmer Paper
Ink: Night of Navy, Pineapple Punch, Tangerine Tango*
Accessories & Tools: Broadway Lights Framelits, Layering Circle Framelits, Stitched Labels Framelits, Big Shot, Silver Thread, Classic Label Punch
Adhesives: SNAIL or double sided tape, Stampin' Dimensionals, Tear'n'Tape, Fine Tip Glue Pen

*retired items.

EXCLUSIVE ONLINE CLASSES

Join five award-winning Stampin' Up! Artisans throughout July as they bring you exclusive video-based tutorials, inspiring projects, as well as behind-the-scenes tips and tricks to bring your paper crafting to the next level!

Find more information, and subscribe to join us today at http://craftycarrotcollective.blogspot.com.au/

In Class, Broadway Birthday

July 1, 2018

Blog Archive