Showing posts with label Artisan Design Team. Show all posts

Last year I was so honored to serve on the official Stampin' Up! Artisan Design Team.  The team really connected throughout the year and we wanted to reunite to hop together again. So it's with great pleasure that I welcome you to our little reunion party!  I hope that you have a wonderful time and pick up some fun tips and project ideas!


This design I have for you is an over-the-top, mixed metallics, technique filled project!  I made this card at the special request of one of my class friends.  She'd seen a sample on page 48 of the Occasions catalogue and wanted to make something like it.  I took on the challenge and created this variation.  I have a detailed video tutorial for all of you, you can find it on *YouTube HERE*!  I'd love for you to join me, craft alongside and let me know what you think!


I always LOVE when I get a special request to see a technique or design in action as it helps stretch and guide me creatively.  Is there anything you might like to learn more about?  Let me know!

Thank you so much for coming to our reunion!  My friend, Elizabeth Price, is next up in the blog hop.  Click the next link below to see what beautiful project she has to share today!

No photo description available.


Love this project?  Find more of my work here: 
FACEBOOK  |  INSTAGRAM  |  PINTEREST  |  YOUTUBE

Supplies:
Stamps: Picture Perfect Birthday
Card: Grapefruit Grove, Poppy Parade, Whisper White, Shimmery White
Ink: Smoky Slate, Grapefruit Grove, Poppy Parade, VersaMark
Paper: Silver Foil
Accessories & Tools:  Everyday Label Punch, Eclectic Layers Thinlet Dies, Sponge, Spritzer, Copper Embossing Powder, Powder Brush, Copper Thread, Pearls, Stampin' Blends in Pineapple Punch, Big Shot, Stitched Rectangle Framelit Dies, Silver Edged White Ribbon, Copper Twine.
Adhesives: SNAIL or double-sided tape, Stampin' Dimensionals, Tear'n'Tape
Incredible Like You Online Classes April 2019 - The Crafty Carrot Co.

TAKE YOUR CRAFTING TO THE NEXT LEVEL
With it's pretty, bright colour scheme and delicate laser-cut overlays, The Crafty Carrot Co knew it would be so fun to teach you how to use all the Incredible Like You precut elements to develop new skills, step up your crafting game and create your own unique cards and memory keeping projects.


Step by Step
Unsure? View the detailed video tutorial on *YouTube HERE*!
  1. Sponge Grapefruit on Shimmery White 149 x 67mm.  Add a light spritz of water and set aside to dry.  
  2. While drying, prepare sentiment.  Use the side of the ink pad to ink just the top of sentiment in Smoky Slate. Add some Grapefruit ink with a sponge dauber, and then finish with some Poppy Parade ink also applied with sponge dauber.  Huff and puff over the stamp to ensure it is moist and stamp on white.  Cut with stitched rectangle die. 
  3. Once shimmery white panel is dry, apply some VersaMark by swiping the pad over the panel once or twice. Add Copper embossing powder.  Use brush to get the effect you would like and heat set.  Cut diamonds randomly to complete.  Border on silver foil 149 x 70mm.  Attach to centre of folded grapefruit card front.
  4. To finish, layer sentiment on dimensionals over label shape in Poppy, strips of ribbon and loops of twine.

Eclectic Mixed Metallics, A-Team Reunited Blog Hop

March 22, 2019


Welcome to the very last Stampin' Up! Artisan Design team hop for 2018!  Today we are sharing projects featuring the beautiful Frosted Florals Suite.


It's the gift giving season so I created some pretty little gift tags for this assignment.  These decorated the goodie bags I handed out to class participants a little while back.  They also doubled as name tags or were turned into card embellishments by some of my crafty friends.


I do still have one Instagram tip to go live for Stampin' Up! before my Artisan year is over - so keep an eye out for that!  But otherwise, it gives me great pleasure to welcome in the new 2019 team.

I'm super happy to see many friends in the new group.  I just know they are going to have some amazing projects to share throughout 2019 and I can't wait to follow their work!


2019 Stampin' Up! Artisan Design Team


A huge thank you to everyone who has been visiting my blog, leaving comments and supporting my Artisan journey this year.  I look forward to continuing to share with you beautiful people throughout the new year!  Do make sure to 'follow' me in the links below to continue to see what I've got in store for you.

FACEBOOK  |  INSTAGRAM  |  PINTEREST  |  YOUTUBE

Next up on the Artisan blog hop is the amazing Jessica Winter


Supplies Used
Stamps: First Frost, Make a Difference
Card: Whisper White, Night of Navy, Crumb Cake, Pear Pizzazz
Ink: Grapefruit Grove, Petal Pink, Pear Pizzazz, Blueberry Bushell
Accessories & Tools: Petal Pink and Silver Bakers Twine, Frosted Bouquet Framelits, Layering Circle Framelits, Subtles Textured Impressions Embossing Folder, Big Shot


TAKE YOUR CRAFTING TO THE NEXT LEVEL

Attend live online classes with four multi-award-winning Stampin' Up! Artisans! Join our Crafty Carrot Co program from anywhere in the world, from the comfort of your own home!  Follow video-based tutorials, be inspired and see behind-the-scenes tips and tricks to bring your cardmaking to the next level, whether you're a beginner or have years of experience there is something for you! 


Find more information, and subscribe to join us today at http://craftycarrotcollective.blogspot.com.au/

Frosted Florals, Stampin' Up! Artisan Design Team Blog Hop

December 21, 2018


Lots of Christmas craft ideas coming your way today!  The Stampin' Up! Artisan Design Team are featuring the festive 'Making Christmas Bright' Bundle from the 2018 Holiday Catalogue.  For my project, I'm sharing some quick gift tags.


For the tag bases, I watercoloured one piece of Watercolour Card in a mix of Melon Mambo, Petal Pink and Grapefruit Grove.  Then I cut it into 8 evenly sized panels once dry. 


Each tag was decorated with imagery from the Making Christmas Bright stamp set, stamped in VersaMark and heat set with gold embossing powder.


The adorable 'All is Bright' paper clips made it so easy to attach these to ribbon bows on these gift jars.

I'm a huge jar hoarder - I love having reused jars on hand to fill and gift out.  These are filled with a Pumpkin Spiced Trail Mix, this tasty recipe is *HERE*.

Next up on the Artisan blog hop is Jessica Winter


Love this design? Find more of my projects on
FACEBOOK  |  INSTAGRAM  |  PINTEREST  |  YOUTUBE


TAKE YOUR CRAFTING TO THE NEXT LEVEL

Attend live online classes with four multi-award-winning Stampin' Up! Artisans! Join our Crafty Carrot Co program from anywhere in the world, from the comfort of your own home!  Follow video-based tutorials, be inspired and see behind-the-scenes tips and tricks to bring your cardmaking to the next level, whether you're a beginner or have years of experience there is something for you! 


Find more information, and subscribe to join us today at http://craftycarrotcollective.blogspot.com.au/


Supplies Used
Stamps: Making Christmas Bright
Card: Watercolour
Ink: VersaMark, Petal Pink, Melon Mambo, Grapefruit Grove
Accessories & Tools: Gold Embossing Folder, Heat Tool, Aqua Painter, All is Bright Paper Clips, Grapefruit Grove 1/8" (3.2 Mm) Grosgrain Ribbon

Making Christmas Bright, Artisan Design Team Blog Hop

November 16, 2018


The Stampin' Up! Artisan Design Team are back with another special "Snowflake Showcase" blog hop today.  The Snowflake Showcase promotion offers an exclusive set of products that are available for a limited time only.


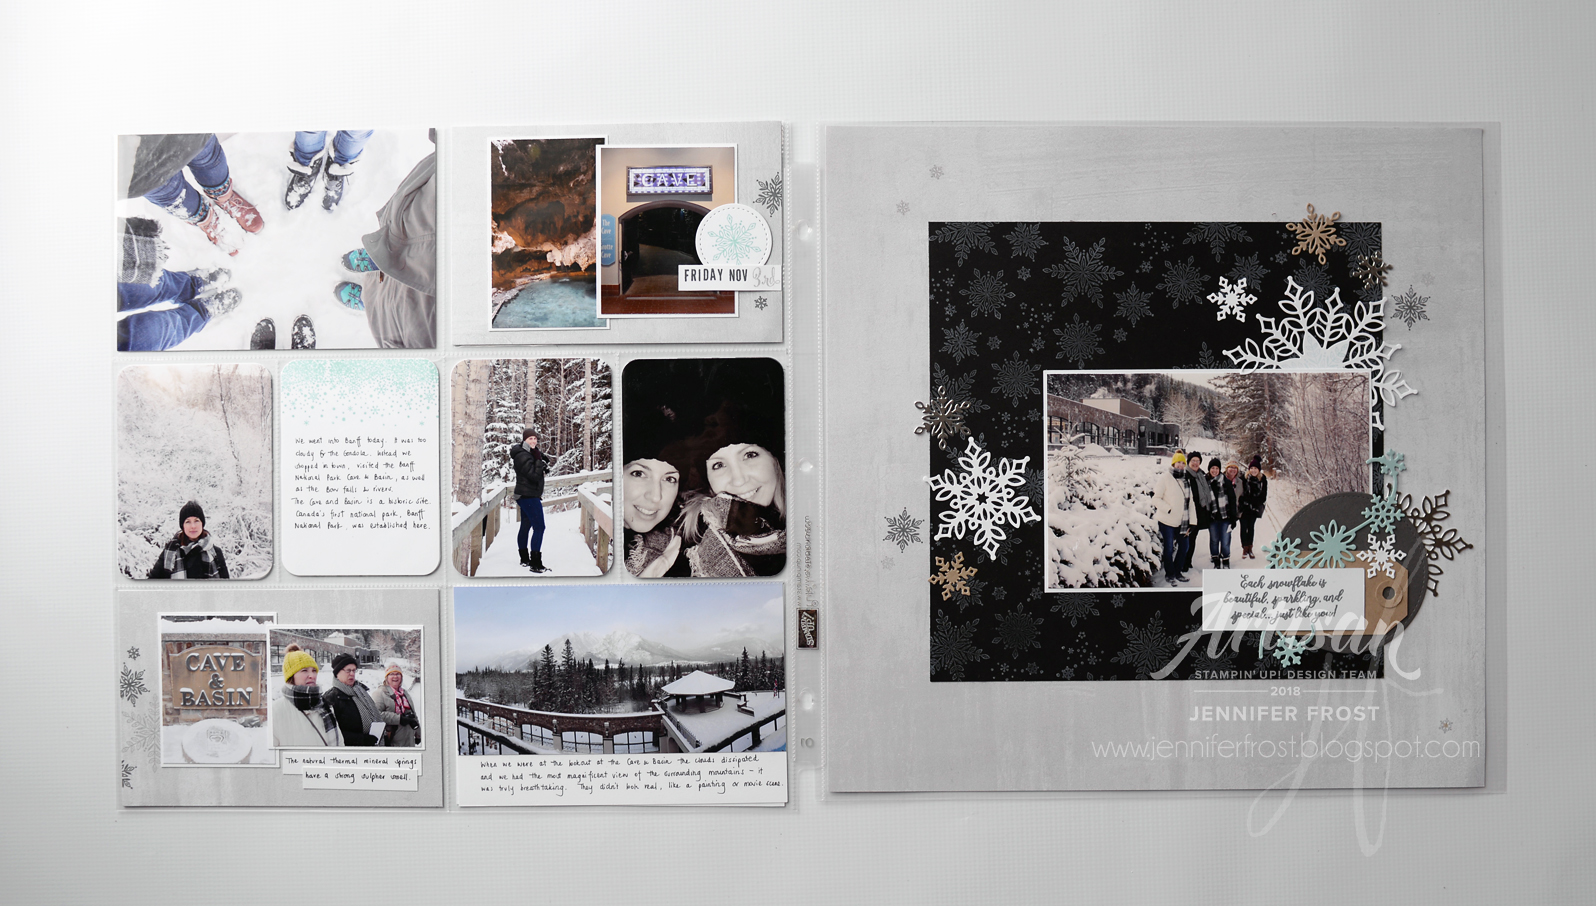
Here in Australia, the weather is getting hotter as we approach the start of Summer.  To get inspired by these lovely snowflakes I brought my mind back to my most recent experience with snowflakes - my trip to Canada last November.


To get started, I stamped an entire piece of black cardstock randomly with snowflakes in white craft ink.  I used this as the main background for the traditional layout, then added a spray of Snowfall thinlet embellishments.


For the matching pocket scrapbook layout, I used just the stamps.


This gorgeous light grey patterned paper from the Petal Promenade has a lovely subtle icy look to it that I think works so well with these snowflakes.

Click the 'next' link below to see what the rest of the Artisan Design team have created with this incredible assortment of products.  Next up in the hop is Jessica Winter.


Love this design? Find more of my projects on
FACEBOOK  |  INSTAGRAM  |  PINTEREST  |  YOUTUBE


TAKE YOUR CRAFTING TO THE NEXT LEVEL

Attend live online classes with four multi-award-winning Stampin' Up! Artisans! Join our Crafty Carrot Co program from anywhere in the world, from the comfort of your own home!  Follow video-based tutorials, be inspired and see behind-the-scenes tips and tricks to bring your cardmaking to the next level, whether you're a beginner or have years of experience there is something for you! 


Find more information, and subscribe to join us today at http://craftycarrotcollective.blogspot.com.au/


Supplies Used
Stamps: Snow is Glistening, Make a Difference
Card: Whisper White, Basic Black, Pool Party, Crumb Cake, Basic Gray
Paper: Petal Promenade, Silver Foil
Ink: Whisper White, Basic Gray, Smoky Slate, Pool Party
Accessories & Tools: 1/2" Circle Punch, Snowfall Thinlets, Stitched Shapes Framelits
Adhesives: SNAIL or double-sided tape, Fine Tip Glue Pen, Stampin' Dimensionals

Snow is Glistening, Artisan Design Team Blog Hop

November 2, 2018


The Artisan Design Team is here with our official Stampin' Up! October blog hop! We are featuring the Country Lane Suite from the newly released holiday catalogue (that's page 43 for those playing along at home).  I've combined these with the Bakers Boxes, also in the holiday catalogue.  You must check these out if you haven't already!  So great for gift giving.


The farmhouse decorating trend is so in right now, wherever you live!  We are renovating our home at the moment and are just loving adding touches of country comfort into each space.  It's so nice to see Stampin' Up! choose to incorporate the trend in this gorgeous product suite.  This Tin Tile Embossing Folder is to die for! I used an aqua painter to brush over a little copper shimmer paint for the shiny metallic finish.


Our Stampin' Blend markers are perfect for colouring these florals.  I couldn't resist playing around with a few colour combinations - do you have one you like best?


Do you love this product suite and want more inspiration?  Click 'next' to continue the blog hop below and see what the lovely Jessica Winter has made.


Supplies Used
Stamps: Country Home
Card: Whisper White, Cajun Craze, Crumb Cake
Ink: Memento Black, Rich Razzleberry, Petal Pink, Pool Party
Accessories & Tools: Assorted Stampin Blends, Braided Linen Trim, Tin Tile Textured Impressions Embossing Folder, Copper Shimmer Paint, Aqua Painter, Bakers Boxes
Adhesives: SNAIL or double sided tape, Stampin' Dimensionals


WANT MORE COUNTRY HOME IDEAS?  IT'S NOT TOO LATE!

Attend live online classes with at least four multi-award-winning Stampin' Up! Artisans! Join our Crafty Carrot Co program from anywhere in the world, from the comfort of your own home!  Follow video-based tutorials, be inspired and see behind-the-scenes tips and tricks to bring your cardmaking to the next level, whether you're a beginner or have years of experience there is something for you! 

Find more information, and subscribe to join us today at http://craftycarrotcollective.blogspot.com.au/


Country Home, Stampin' Up! Artisan Design Team Blog Hop

October 19, 2018


The Stampin' Up! Artisan Design Team are introducing the "Snowflake Showcase" promotion today.  This is an exclusive set of products that are available for a limited time only.

For this first design, I matched the medallion from the Happiness Surrounds stamp set with my favourite grey stone Petal Promenade paper for a simple but pretty background.  Then I added a few layers - a strip of pink Nature's Poem paper, a flirty flamingo stamped flower and the sentiment in these same two pink tones.

The floral Snowflake Trinket from this promotion lends an instant 'wow' factor to the project.  I've complimented this with a few additional rhinestones to finish.

Whilst this first design can be made with the stamps alone, my second project kicks things up a notch with the addition of the exclusive Snowfall thinlets.


This 'pocket card' also features a grey and pink colour scheme, with a little extra pop of pool party.  Here I've gone with a basic grey base, heat embossed with that pretty medallion.  Then I've added a little soft sponging in whisper white ink before adding a scatter of die cut pieces in the same grey tone.

The sentiment is silver heat embossed on vellum and is anchored by layered Snowfall die elements that all sit upon a piece of stone grey patterned paper punched with the Everyday Label Punch.


Loving these 'Snowfall Showcase' goodies so far?  Fellow demonstrators can preorder all the exclusive products in this promotion throughout October.  Customers will have to be patient, mark your diary and plan to pick up yours this November!


Need more convincing?  Click the 'next' link below to see what the rest of the Artisan Design team have created with this incredible assortment of products.  Next up in the hop is Jessica Winter.


Supplies Used
Stamps: Happiness Surrounds
Card: Whisper White, Smoky Slate, Basic Gray, Flirty Flamingo, Pool Party, Vellum
Paper: Petal Promenade and Natures Poem Designer Series Papers
Ink: Granite Gray, Flirty Flamingo, Petal Pink, VersaMark, Whisper White 
Accessories & Tools: Rhinestones, Snowflake Trinkets, Silver and White Heat Embossing Powders, Heat Tool, Sponge Dauber, Snowfall Thinlets, Big Shot, Everyday Label Punch, Silver Thread, Circle Tab Punch, Silver Mini Sequin Trim
Adhesives: SNAIL or double sided tape, Fine Tip Glue Pen


TAKE THE GUESSWORK OUT OF YOUR CHRISTMAS CRAFTING

Attend live online classes with four multi-award-winning Stampin' Up! Artisans! Join our Crafty Carrot Co program from anywhere in the world, from the comfort of your own home!  Follow video-based tutorials, be inspired and see behind-the-scenes tips and tricks to bring your cardmaking to the next level, whether you're a beginner or have years of experience there is something for you! 

Find more information, and subscribe to join us today at http://craftycarrotcollective.blogspot.com.au/

Happiness Surrounds, Artisan Design Team Blog Hop

October 5, 2018


Welcome to another Artisan Design Team blog hop.  This month we are sharing the Petal Promenade suite.  Everything in this suite has such a lovely, soft, romantic feel to it and if you follow my work you'll know that is right up my alley!

I was really drawn to the pretty bokeh patterned paper from the Petal Promenade pack.  It immediately made me think of a sweet baby themed project.


So for my project today I created a scrapbook page.  I'm just so pleased I got a chance to print these adorable photos of my girl and relive the memories of her playful baby smiles through this creative endeavour.


Alongside the Beautiful Promenade stamped imagery, I mixed in some page titles, hand stamped using my fav alphabet sets - Lined and Labeller.

Be sure to click the next link below to see inspiration my Artisan friend Jessica Winter has to share today!


Supplies Used
Stamps: Beautiful Promenade, Labeller Alphabet, Lined Alphabet
Card: Whisper White, Melon Mambo, Sahara Sand, Soft Sea Foam, Petal Pink
Paper: Petal Promenade Designer Series Paper
Ink: Petal Pink, Soft Sea Foam, Melon Mambo, Garden Green
Accessories & Tools: Beautiful Layers Thinlet Dies, Stitched Labels Framelits, Hole Punch, 1/2 Circle Punch
Adhesives: SNAIL or double sided tape


GET ORGANISED WITH THIS BRAND NEW PRINTABLE
This is a super easy & fun way to stay on top of your business efforts each month.
Stay organised with these business tracking templates.
Includes:

  • Monthly Income/Expenses
  • Orders
  • Social Media Following
Learn more *HERE*

Beautiful Promenade, Stampin' Up! Artisan Design Team Blog Hop

September 21, 2018

Blog Archive